- жµПиІИ: 913679 жђ°
-

жЦЗзЂ†еИЖз±ї
з§ЊеМЇзЙИеЭЧ
- жИСзЪДиµДиЃѓ ( 0)
- жИСзЪДиЃЇеЭЫ ( 0)
- жИСзЪДйЧЃз≠Ф ( 0)
е≠Шж°£еИЖз±ї
- 2012-04 ( 2)
- 2011-12 ( 2)
- 2011-11 ( 52)
- жЫіе§Ъе≠Шж°£...
жЬАжЦ∞иѓДиЃЇ
-
wmaizai163пЉЪ
жЬЙжЇРз†БжЦЗдїґдєИ еПѓи∞ГиѓХзЪДйВ£зІН¬† еПСжИСйВЃзЃ±еПѓдї•дєИ¬† 3906902 ...
javaжЦЗдїґдЉ†иЊУ -
shenselonggeпЉЪ
жОТзЙИиГљеР¶жФєжФє
Mina2.0ж°ЖжЮґжЇРз†БеЙЦжЮРпЉИдЄАпЉЙ -
grandryпЉЪ
и∞Ґи∞ҐпЉБињЩжШѓдЄАдЄ™еЫ∞жЙ∞жИСе§ЪжЧґзЪДйЧЃйҐШ
delphiзЪДtclientdatasetзЪДдЄ≠жЦЗињЗжї§дљњзФ®ж≥®жДПдЇЛй°є -
LongXiTianXiaпЉЪ
жИСдЄНзЯ•йБУеУ™йЗМдЄЛиљљйВ£дЄ™зїДдїґ
еЯЇдЇОжЬізі†иіЭеПґжЦѓеИЖз±їеЩ®зЪДжЦЗжЬђеИЖз±їзЃЧж≥ХпЉИдЄЛпЉЙ -
LongXiTianXiaпЉЪ
еПѓдї•иѓідЄАдЄЛеИЖиѓНзїДдїґжАОдєИдљњзФ®еРЧпЉЯ
еЯЇдЇОжЬізі†иіЭеПґжЦѓеИЖз±їеЩ®зЪДжЦЗжЬђеИЖз±їзЃЧж≥ХпЉИдЄЛпЉЙ
гАРиѓСгАСTetroGL: An OpenGL Game Tutorial in C++ for Win32 Platforms - Part 2 пЉИдЄКпЉЙ
еОЯжЦЗйУЊжО•пЉЪTetroGL: An OpenGL Game Tutorial in C++ for Win32 Platforms - Part 2
еЬ®ињЩдЄ™з≥їеИЧзЪДзђђдЄАйГ®еИЖдЄ≠,дљЬиАЕдїЛзїНдЇЖз™ЧеП£зЪДеИЫеїЇдї•еПКOpenGLзОѓеҐГзЪДеИЫеїЇ,еЬ®жО•дЄЛжЭ•ињЩдЄАйГ®еИЖдЄ≠,дљЬиАЕе∞ЖдїЛзїНе¶ВдљХе§ДзРЖжЄЄжИПдЄ≠зЪДиµДжЇРдї•еПКе¶ВдљХжШЊз§ЇзЃАеНХзЪДеК®зФї
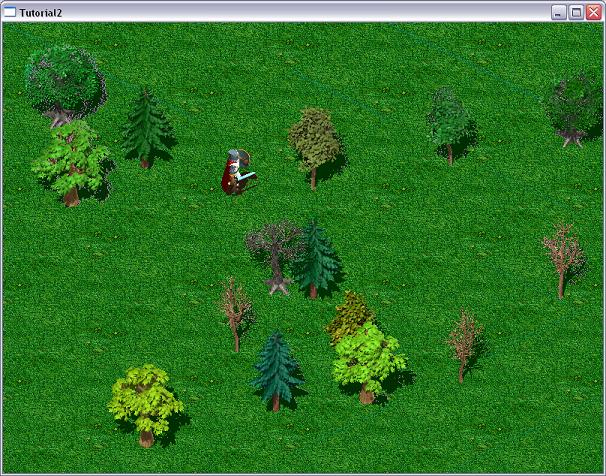
зЃАдїЛ
ињЩдЄ™з≥їеИЧзЪДзђђдЄАзѓЗжЦЗзЂ†еЕ≥ж≥®дЇОз™ЧеП£зЪДеИЫеїЇеТМOpenGLзОѓеҐГзЪДеИЫеїЇ,жЬђжЦЗе∞ЖжЬЙиґ£зЪДе§Ъ,еЫ†дЄЇжИСдїђе∞Же∞ЭиѓХеК†иљљжШЊз§ЇеЫЊзЙЗжЦЗдїґ,еєґдЄФжШЊз§ЇдЄАдЇЫеК®зФїжХИжЮЬ.дљ†е∞ЖдЉЪзЬЛеИ∞е¶ВдљХжЙНиГљжЬЙжХИеЬ∞жУНзЇµињЩдЇЫиµДжЇР.ељУзДґжЬђжЦЗеЃМжИРзЪДй°єзЫЃињШдЄНжШѓдЄАдЄ™жЄЄжИП,еЫ†дЄЇеЃГињШж≤°жЬЙеК†еЕ•дїїдљХжЄЄжИПйАїиЊС,еЃГеФѓдЄАиГљеБЪзЪДдїЕдїЕжШѓеЬ®е±ПеєХдЄКзІїеК®дЇЇзЙ©иІТиЙ≤,еєґдЄФзФ®еК®зФїзЪДжХИжЮЬжШЊз§Ї(ж≤°жЬЙеЃЮзО∞зҐ∞жТЮж£АжµЛ)
жЦЗдїґзЪДзїДзїЗ
й¶ЦеЕИжЭ•иАГиЩСе¶ВдљХжЫіе•љеЬ∞зїДзїЗжЦЗдїґиµДжЇР.дљЬиАЕдЄАиИђдЉЪеИЫеїЇдЄАдЄ™srcжЦЗдїґе§єжЭ•жФЊзљЃжЙАжЬЙзЪДжЇРжЦЗдїґ(.hеТМ.cpp),дЄАдЄ™binжЦЗдїґе§єжЭ•жФЊзљЃжЬАзїИзЪДеПѓжЙІи°МжЦЗдїґеТМжЙАжЬЙжЙАйЬАи¶БзЪДиµДжЇР,дЄАдЄ™objжЦЗдїґе§є
зФ®жЭ•жФЊзљЃзЉЦиѓСжЙАеЊЧеИ∞зЪДдЄ≠йЧіжЦЗдїґ,дЄАдЄ™dependenciesжЦЗдїґе§єжФЊзљЃзФ®еИ∞зЪДзђђдЄЙжЦєеЇУ.е¶ВжЮЬдљ†жЬЙиЃЄе§ЪиµДжЇР(еЫЊзЙЗ,йЯ≥дєР,йЕНзљЃжЦЗдїґз≠Й),дљ†зФЪиЗ≥еПѓдї•е∞ЖbinжЦЗдїґе§єињЫдЄАж≠•еИТеИЖдЄЇе≠РжЦЗдїґе§є.
зО∞еЬ®жИСдїђе∞±жЭ•жМЙзЕІдЄКйЭҐзЪДжЦЗдїґзїДзїЗ嚥еЉПжЭ•жЫіжФєй°єзЫЃиЃЊзљЃ.еѓєдЇОжЇРжЦЗдїґ,еП™йЬАи¶Бе∞ЖеЃГдїђе§НеИґеИ∞srcжЦЗдїґе§єдЄ≠,еєґе∞ЖеЕґеК†еЕ•й°єзЫЃе∞±и°М.дЄЇдЇЖйЕНзљЃиЊУеЗЇжЦЗдїґе§єеТМдЄ≠йЧіжЦЗдїґе§є,жЫіжФєе¶ВдЄЛеЫЊ:

$(SolutionDir) еТМ$(ConfigurationName) жШѓйҐДеЕИеЃЪдєЙзЪДеЃП.еЙНдЄАдЄ™жМЗеРСиІ£еЖ≥жЦєж°ИжЙАеЬ®жЦЗдїґе§є,еРОдЄАдЄ™жМЗеРСељУеЙНжіїеК®йЕНзљЃ(debug or release):еЬ®objжЦЗдїґе§єдЄ≠,дЉЪеИЫеїЇеЗЇдЄ§дЄ™е≠РжЦЗдїґе§є,дЄАдЄ™йЕНзљЃдЄАдЄ™жЦЗдїґе§є
еК†иљљеЫЊзЙЗ
еЊИдЄНеєЄ,OpenGLеѓєдЇОеК†иљљеЫЊзЙЗж≤°жЬЙжПРдЊЫдїїдљХеЄЃеК©.еЫ†ж≠§жИСдїђењЕй°їеАЯеК©зђђдЄЙжЦєеЇУзЪДеЄЃеК©.жЬЙеЊИе§ЪзђђдЄЙжЦєеЇУеПѓдЊЫйАЙжЛ©,дљЬиАЕжПРдЊЫдЇЖдЄ§дЄ™еїЇиЃЃ: DevIL еТМFreeImage.DevILжЫійАВеРИдЇОOpenGL,еЫ†ж≠§дљЬиАЕйАЙжЛ©дЇЖеЃГ.
й¶ЦеЕИи¶БеБЪзЪДжШѓе∞ЖжЙАйЬАи¶БзЪДDevILжЦЗдїґжЛЈиіЭеИ∞dependenciesжЦЗдїґе§єдЄ≠:й¶ЦеЕИеИЫеїЇдЄАдЄ™е≠РжЦЗдїґе§єDevIL,еєґе∞ЖDevILеЃШзљСдЄКзЪДжЦЗдїґжЛЈиіЭиЗ≥ж≠§.и¶Бж≠£з°ЃеЬ∞дљњзФ®еЃГ,жИСдїђењЕй°їдњЃжФєдЄАдЄ™жЦЗдїґзЪДеРНе≠Ч:еЬ®вАЭinclude/ILвАЭжЦЗдїґе§єдЄ≠,жЬЙдЄАдЄ™еРНдЄЇconfig.h.winзЪДжЦЗдїґ,е∞ЖеЕґйЗНеСљеРНдЄЇconfig.h.зДґеРОжЛЈиіЭDevIL.dllеИ∞дљ†зЪДbinжЦЗдїґе§єдЄ≠,еЫ†дЄЇеЃГе∞ЖдЉЪ襀䚆зЪДеПѓжЙІи°МжЦЗдїґдљњзФ®еИ∞.
зДґеРОжИСдїђењЕй°їеЬ®й°єзЫЃе±ЮжАІдЄ≠ињЫи°МйЕНзљЃ,дї•дЊњдљњзФ®DevIL.е¶ВдЄЛеЫЊжЙАз§Ї:
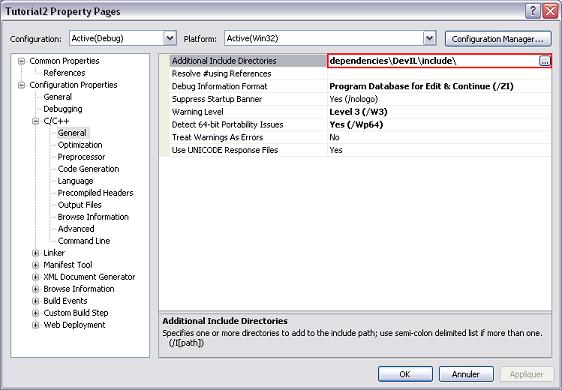
ињЩе∞ЖдЉЪеСКиѓЙзЉЦиѓСеЩ®еИ∞еУ™йЗМеОїеѓїжЙЊжЙАйЬАи¶БзЪДDevILе§іжЦЗдїґ,ињЩж†ЈиЃЊзљЃ,жИСдїђе∞±еПѓдї•дЄНењЕжПРдЊЫDevILе§іжЦЗдїґзЪДеЕ®иЈѓеЊД.
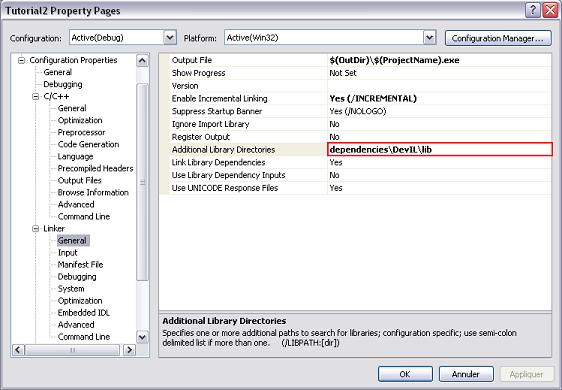
дЄКеЫЊйЕНзљЃе∞±еСКиѓЙйУЊжО•еЩ®еИ∞еУ™йЗМеОїеѓїжЙЊйЩДеК†зЪДжЦЗдїґе§є(ињЩдЄ™жЦЗдїґе§єдЄ≠еМЕеРЂдЇЖи¶БйУЊжО•зЪДеЇУжЦЗдїґ).
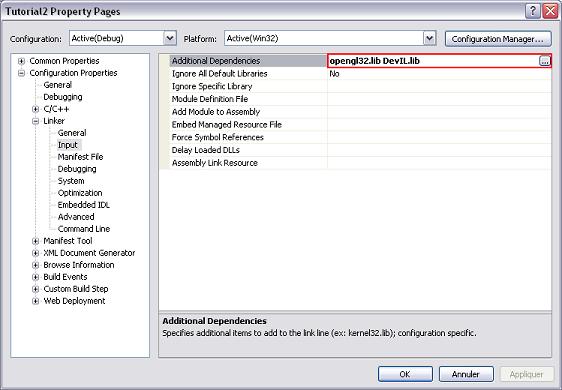
дЄКеЫЊйЕНзљЃдЉЪеСКиѓЙзЉЦиѓСеЩ®ж≠§й°єзЫЃењЕй°їйУЊжО•DevILеЇУеТМOpenGLеЇУ.
иµДжЇРзЃ°зРЖ
зО∞еЬ®дљњзФ®DevILзЪДзОѓеҐГеЈ≤зїПжР≠еїЇе•љдЇЖ,жИСдїђзО∞еЬ®еЉАеІЛеК†иљљдЄАдЇЫеЫЊзЙЗеєґжШЊз§ЇеЃГдїђ.дљЖеЬ®ж≠§дєЛеЙН,жИСдїђеЕИиАГиЩСдЄЛе¶ВдљХжЫіжЬЙжХИеЬ∞зЃ°зРЖињЩдЇЫиµДжЇРжЦЗдїґ.еБЗиЃЊжИСдїђйЬАи¶БжШЊз§ЇдЄАж£µж†С,еЃГеМЕеРЂеЬ®дЄ™еРНдЄЇtree.pngзЪДжЦЗдїґдЄ≠,жЬАжЪіеКЫзЪДжЦєж≥ХжШѓзЃАеНХеЬ∞еК†иљљжЦЗдїґеєґдњЭе≠ШеЬ®еЖЕе≠ШдЄ≠,ињЩж†ЈеЬ®жѓПжђ°йЗНзїШеЄІжЧґеПѓдї•йЗНзФ®еЃГ.ињЩзІНжЦєж≥ХзЬЛиµЈжЭ•дЄНйФЩ,дљЖеЃГжЬЙдЄАдЄ™е∞ПйЧЃйҐШ:еБЗиЃЊжИСдїђзО∞еЬ®йЬАи¶БжШЊз§Їж≠§ж†СзЪДжђ°жХ∞иґЕињЗдЄАжђ°,йВ£дєИжИСдїђе∞±ењЕй°їеЗ†жђ°еЬ®еЖЕе≠ШдЄ≠еК†иљљзЇєзРЖжЦЗдїґ,иАМињЩжШЊзДґжШѓдљОжХИзЪД.жИСдїђењЕй°їи¶БжГ≥дЄАдЄ™еКЮж≥Х,еН≥дљњжИСдїђеЬ®дЄНеРМдљНзљЃзЪДдї£з†БдЄ≠дєЯиГљдљњзФ®еРМдЄАдїљзЇєзРЖжЦЗдїґ.ињЩйАЪињЗе∞ЖеК†иљљиµДжЇРжЦЗдїґдї£зРЖзїЩдЄАдЄ™зЙєеЃЪзЪДз±ї:зЇєзРЖжЦЗдїґзЃ°зРЖиАЕе∞±еПѓдї•иљїжЭЊеЬ∞иІ£еЖ≥.иЃ©жИСдїђй¶ЦеЕИжЭ•зЬЛзЬЛињЩдЄ™з±ї:
<!--<br /><br />Code highlighting produced by Actipro CodeHighlighter (freeware)<br />http://www.CodeHighlighter.com/<br /><br />-->#include"Texture.h"
#include<string>
#include<map>
//Thetexturemanageravoidasametexturetobeloadedmultiple
//times.Itkeepsamapcontainingallthealreadyloadedtextures.
classCTextureManager
{
public:
//Loadsatexturespecifiedbyitsfilename.Ifthetextureisnot
//loadedalready,thetexturemanagerwillloadit,storeitand
//returnit.Otherwiseitsimplyreturnstheexistingone.
CTexture*GetTexture(conststd::string&strTextName);
//Releasethetexturespecifiedbyitsfilename.Returnstrueif
//thetexturewasfound,otherwisefalse.
boolReleaseTexture(conststd::string&strTextName);
//Returnsthesingleinstanceofthetexturemanager.
//Themanagerisimplementedasasingleton.
staticCTextureManager*GetInstance();
protected:
//Bothconstructoranddestructorareprotectedtomake
//itimpossibletocreateaninstancedirectly.
CTextureManager();
~CTextureManager();
private:
typedefstd::map<std::string,CTexture*>TTextureMap;
//Themapofalreadyloadedtextures.Thereareindexed
//usingtheirfilename.
TTextureMapm_Textures;//еЈ≤еК†иљљзЪДиµДжЇРжЦЗдїґжШ†е∞Ди°®
};
ињЩдЄ™з±їжШѓдї•еНХдЊЛж®°еЉПеЃЮзО∞зЪД.
{
//Returnstheuniqueclassinstance.
staticCTextureManagerInstance;
return&Instance;
}
ињЩж†Је∞±еПѓдї•жЛ•жЬЙдЄАдЄ™еЕ®е±АеФѓдЄАзЪДеЃЮдЊЛ,еєґдЄФиЃњйЧЃеЃГдєЯеНБеИЖзЃАеНХ:
ињЩдЄ™з±їзЪДжЮДйА†еЗљжХ∞иіЯиі£еѓєDevILеЇУињЫи°МеИЭеІЛеМЦ:
{
//InitializeDevIL
ilInit();
//Setthefirstloadedpointtothe
//upper-leftcorner.
ilOriginFunc(IL_ORIGIN_UPPER_LEFT);
ilEnable(IL_ORIGIN_SET);
}
еЬ®и∞ГзФ®DevILеЇУеЗљжХ∞еЙН,ењЕй°їеЕИи∞ГзФ®ilInitдї•дЊњеѓєеЇУињЫи°МеИЭеІЛеМЦ.ж≠§е§Ц,жИСдїђињШйЬАи¶БжМЗжШОеЫЊзЙЗе¶ВдљХињЫи°МеК†иљљ:еЕИжШѓеЈ¶дЄКжЦє.ињЩж†ЈеБЪзЪДзЫЃзЪДжШѓжИСдїђе∞±дЄНйЬАи¶БеѓєзЇєзРЖеЫЊзЙЗињЫи°Мзњїиљђ.йїШиЃ§жГЕеЖµдЄЛињЩдЄ™йАЙй°єжШѓз¶Бж≠ҐзЪД,еЫ†ж≠§жИСдїђйЬАи¶Би∞ГзФ®ilEnable(IL_ORIGIN_SET);жЭ•дљњдєЛиЃЊзљЃдЄЇеЕБиЃЄ.
зО∞еЬ®жЭ•зЬЛзЬЛGetTextureжЦєж≥Х:
<!--<br /><br />Code highlighting produced by Actipro CodeHighlighter (freeware)<br />http://www.CodeHighlighter.com/<br /><br />-->CTexture*CTextureManager::GetTexture(conststring&strTextName)
{
//Lookinthemapifthetextureisalreadyloaded.
TTextureMap::const_iteratoriter=m_Textures.find(strTextName);
if(iter!=m_Textures.end())
returniter->second;
//Ifitwasnotfound,trytoloaditfromfile.Iftheload
//failed,deletethetextureandthrowanexception.
CTexture*pNewText=NULL;
try
{
pNewText=newCTexture(strTextName);
}
catch(CException&e)
{
deletepNewText;
throwe;
}
//Storethenewlyloadedtextureandreturnit.
m_Textures[strTextName]=pNewText;
returnpNewText;
}
еЊИзЃАеНХзЪДеЃЮзО∞дї£з†Б:й¶ЦеЕИж†єжНЃзїЩеЃЪзЪДжЦЗдїґеРНеЬ®жШ†е∞Ди°®дЄ≠жЯ•жЙЊжЦЗдїґжШѓеР¶еЈ≤зїПеК†иљљињЫжЭ•дЇЖ,иЛ•жШѓеИЩзЫіжО•ињФеЫЮ,еР¶еИЩе∞±дїОжЦЗдїґдЄ≠ињЫи°МеК†иљљ.еЊЕдЉЪжИСдїђдЉЪзЬЛеИ∞еЬ®CTextureз±їзЪДжЮДйА†еЗљжХ∞дЄ≠дЉЪе∞ЭиѓХеК†иљљжЦЗдїґ,и˕姱賕еИЩжКЫеЗЇеЉВеЄЄ.еЫ†ж≠§,еЬ®зЇєзРЖжЦЗдїґзЃ°зРЖиАЕз±їдЄ≠,иЛ•жНХиОЈеИ∞ж≠§еЉВеЄЄ,е∞±еИ†йЩ§зЇєзРЖжЦЗдїґ(ињЩжШѓдЄЇдЇЖйБњеЕНеЖЕе≠Шж≥ДйЬ≤)еєґдЄФеЖНжђ°жКЫеЗЇеЉВеЄЄ.иЛ•жЦЗдїґеК†иљљжИРеКЯ,еИЩе∞ЖеЕґдњЭе≠ШеИ∞жШ†е∞Ди°®дЄ≠(дї•еЕґжЦЗдїґеРНдљЬдЄЇйФЃеАЉ).
ж≠§е§Ц,жИСдїђињШжПРдЊЫдЇЖйЗКжФЊеЈ≤еК†иљљиµДжЇРзЪДжЦєж≥Х,йЭЮеЄЄзЃАеНХзЪДеЃЮзО∞:еЬ®жШ†е∞Ди°®дЄ≠жЯ•жЙЊ,иЛ•е≠ШеЬ®е∞±еИ†йЩ§еЃГ,еєґдЄФдїОжШ†е∞Ди°®дЄ≠зІїйЩ§.
{
//Retrievethetexturefromthemap
boolbFound=false;
TTextureMap::iteratoriter=m_Textures.find(strTextName);
if(iter!=m_Textures.end())
{
//Ifitwasfound,wedeleteitandremovethe
//pointerfromthemap.
bFound=true;
if(iter->second)
deleteiter->second;
m_Textures.erase(iter);
}
returnbFound;
}
иµДжЇРеМЕи£Ез±їCTexture
<!--<br /><br />Code highlighting produced by Actipro CodeHighlighter (freeware)<br />http://www.CodeHighlighter.com/<br /><br />-->#include<Windows.h>
#include"GL/gl.h"
#include<string>
classCTextureManager;
//Classthatwrapsinformationaboutatexture.Thisclass
//won'tbeuseddirectlybytheusers.Instead,theywill
//manipulatetheCImageclass.
classCTexture
{
friendclassCTextureManager;
public:
//Specifiesacolorkeytobeusedforthetexture.Thecolor
//specifedasargumentswillbetransparentwhenthetexture
//isrenderedonthescreen.
voidSetColorKey(unsignedcharRed,unsignedcharGreen,unsignedcharBlue);
//Returnsthewidthofthetexture
unsignedintGetWidth()const{returnm_TextData.nWidth;}
//Returnstheheightofthetexture.
unsignedintGetHeight()const{returnm_TextData.nHeight;}
//Adds/releaseareferenceforthetexture.WhenReleaseReference
//iscalledanddecreasesthereferencecountto0,thetexture
//isreleasedfromthetexturemanager.
voidAddReference();
voidReleaseReference();
//BindthistexturewithopenGL:thistexturebecomes
//the'active'textureinopenGL.
voidBind()const;
protected:
//Constructorwhichtakesthefilenameasargument.
//Itloadsthefileandthrowanexceptioniftheload
//failed.
CTexture(conststd::string&strFileName);
~CTexture();
private:
//Loadsthetexturefromthespecifedfile.Throwsan
//exceptioniftheloadfailed.
voidLoadFile(conststd::string&strFileName);
//Structurethatcontainstheinformationaboutthetexture.
structSTextureData
{
//Widthofthetexture
unsignedintnWidth;//зЇєзРЖеЃљеЇ¶
//Heightofthetexture
unsignedintnHeight;//зЇєзРЖйЂШеЇ¶
//Bytearraycontainingthetexturedata
unsignedchar*pData;//еМЕеРЂзЇєзРЖжХ∞жНЃзЪДе≠ЧиКВжХ∞зїД
};
STextureDatam_TextData;
//TheopenGLidassociatedwiththistexture.
mutableGLuintm_glId;
//Referencecountofthenumberofimagesthatstillholdareference
//tothistexture.Whennoimagesreferencethetextureanymore,itis
//released.
intm_iRefCount;//еЉХзФ®иЃ°жХ∞
//Thefilenamefromwhichthetexturewasloadedfrom.
std::stringm_strTextName;
};
жИСдїђеПѓдї•зЬЛеИ∞ж≠§з±їзЪДжЮДйА†еЗљжХ∞жШѓеПЧдњЭжК§зЪД,ињЩжШѓеЫ†дЄЇеП™еЕБиЃЄCTextureManagerз±їиГље§ЯеИЫеїЇзЇєзРЖ,ињЩдєЯжШѓдЄЇдїАдєИе∞ЖеЕґиЃЊдЄЇж≠§з±їзЪДеПЛеЕГз±ї.CTextureз±їзЪДж†ЄењГжШѓSTextureDataзїУжЮДдљУ,еЃГеМЕеРЂдЇЖдїОжЦЗдїґеК†иљљињЫзЪДжЙАжЬЙдњ°жБѓ:еМЕеРЂжЦЗдїґжХ∞жНЃзЪДе≠ЧиКВжХ∞зїД,зЇєзРЖзЪДеЃљеЇ¶еТМйЂШеЇ¶.
дЄЛйЭҐзЬЛзЬЛз©ґзЂЯжШѓе¶ВдљХеК†иљљжЦЗдїґзЪД:
<!--<br /><br />Code highlighting produced by Actipro CodeHighlighter (freeware)<br />http://www.CodeHighlighter.com/<br /><br />-->voidCTexture::LoadFile(conststd::string&strFileName)
{
//GenerateanewimageIdandbinditwiththe
//currentimage.
ILuintimgId;
ilGenImages(1,&imgId);
ilBindImage(imgId);
//Loadthefiledatainthecurrentimage.
if(!ilLoadImage(strFileName.c_str()))
{
stringstrError="Failedtoloadfile:"+strFileName;
throwCException(strError);
}
//StorethedatainourSTextureDatastructure.
m_TextData.nWidth=ilGetInteger(IL_IMAGE_WIDTH);
m_TextData.nHeight=ilGetInteger(IL_IMAGE_HEIGHT);
unsignedintsize=m_TextData.nWidth*m_TextData.nHeight*4;//е≠ЧиКВжХ∞,RGBAз±їеЮЛ
m_TextData.pData=newunsignedchar[size];
ilCopyPixels(0,0,0,m_TextData.nWidth,m_TextData.nHeight,
1,IL_RGBA,IL_UNSIGNED_BYTE,m_TextData.pData);
//Finally,deletetheDevILimagedata.
ilDeleteImage(imgId);
}
ж≠£е¶Вдљ†зЬЛеИ∞зЪД,жИСдїђдљњзФ®DevILжЭ•еК†иљљжЦЗдїґ.й¶ЦеЕИи¶БеБЪзЪДжШѓеИЫеїЇдЄАдЄ™жЦ∞зЪДеЫЊзЙЗid,еєґе∞ЖеЕґзїСеЃЪеИ∞ељУеЙНеЫЊзЙЗдЄК.е¶ВжЮЬдљ†жГ≥дљњзФ®idеѓєжЯРдЄ™зЙєеЃЪеЫЊзЙЗињЫи°МдЄАдЇЫжУНдљЬжЧґ,ињЩжШѓењЕйЬАзЪД.еЃЮйЩЕдЄК,жИСдїђеП™йЬАи¶БеЬ®еИ†йЩ§еЫЊзЙЗжЧґдљњзФ®еЃГ.зДґеРО,жИСдїђдљњзФ®ilLoadImageе∞ЭиѓХеК†иљљжЦЗдїґ.ињЩдЄ™еЗљжХ∞иіЯиі£е§ДзРЖеРДзІНдЄНеРМзЪДжЦЗдїґж†ЉеЉП,ељУеʆ蚚姱賕жЧґињФеЫЮfalse(дљ†ињШеПѓдї•и∞ГзФ®ilGetErrorжЭ•жߕ胥еЕґйФЩиѓѓдї£з†Б).иЛ•жШѓињЩзІНжГЕеЖµ,жИСдїђзЃАеНХеЬ∞жКЫеЗЇдЄАдЄ™еЉВеЄЄ.е¶ВжЮЬдљ†ињШиЃ∞еЊЧ,еЬ®зђђдЄАзѓЗжЦЗзЂ†дЄ≠ињЩдЇЫеЉВеЄЄе∞ЖдЉЪеЬ®mainеЗљжХ∞дЄ≠襀жНХиОЈ,еєґдЄФеЬ®йААеЗЇз®ЛеЇПеЙНжШЊз§ЇдЄАдЄ™йФЩиѓѓдњ°жБѓ.жО•дЄЛжЭ•,жИСдїђиОЈеПЦеЫЊзЙЗзЪДеЃљеЇ¶еТМйЂШеЇ¶(ilGetIntegerеТМilCopyPixelsеЗљжХ∞еѓєељУеЙНжіїеК®еЫЊзЙЗжАїжШѓжЬЙжХИзЪД).зДґеРО,жИСдїђдЄЇm_TextData.pDataеЯЯеИЖйЕНз©ЇйЧі:жѓПдЄ™еГПзі†зФ±4дЄ™е≠ЧиКВзЉЦз†Б(еЫ†дЄЇжШѓRGBAз±їеЮЛ).зДґеРО,и∞ГзФ®ilCopyPixelsеЗљжХ∞жЭ•жЛЈиіЭзЉУеЖ≤еМЇдЄ≠зЪДеЫЊзЙЗжХ∞жНЃ.еЙНдЄЙдЄ™еПВжХ∞еИЖеИЂжШѓеЉАеІЛжЛЈиіЭзВєзЪДx,y,zдљНзљЃ,жО•дЄЛжЭ•зЪДеПВжХ∞жШѓињЩдЇЫжЦєеРСдЄКеЊЕжЛЈиіЭзЪДеГПзі†жХ∞зЫЃ.зДґеРОжМЗеЃЪеЫЊзЙЗж†ЉеЉП:RGBAжДПеС≥зЭАжѓПдЄ™йҐЬиЙ≤йАЪйБУдЄАдЄ™е≠ЧиКВ(RGB),дї•еПКalphaйАЪйБУдЄАдЄ™е≠ЧиКВ(A).AlphaйАЪйБУзФ®дЇОжМЗжШОеГПзі†зЪДйАПжШОеЇ¶,еАЉдЄЇ0и°®з§ЇеЕ®йАПжШО,еАЉдЄЇ255и°®з§ЇдЄНйАПжШО.зДґеРОжМЗжШОдЇЖжѓПдЄ™йГ®еИЖзЪДз±їеЮЛ:еЃГдїђењЕй°їдї•жЧ†зђ¶еПЈе≠ЧиКВињЫи°МзЉЦз†Б.жЬАеРОдЄАдЄ™еПВжХ∞жШѓеМЕеРЂеГПзі†жХ∞жНЃзЪДзЉУеЖ≤еМЇжМЗйТИ.жЬАеРО,зФ±дЇОжИСдїђдЄНеЖНйЬАи¶БDevILеЫЊзЙЗжХ∞жНЃ,еЫ†ж≠§е∞ЖеЕґеИ†йЩ§.
ж≥®:еЬ®OpenGLдЄ≠дљњзФ®DevILеК†иљљзЇєзРЖеЫЊзЙЗжЬЙжЫіеК†зЃАеНХзЪДжЦєеЉП.ILUTеЇУеЕБиЃЄдљ†и∞ГзФ®ilutGLLoadImageеЗљжХ∞еК†иљљеЫЊзЙЗеєґзЫіжО•иБФз≥їеИ∞дЄАдЄ™OpenGLзЇєзРЖдЄК,ж≠§еЗљжХ∞дЉЪињФеЫЮOpenGLзЇєзРЖзЪДid.ињЩжШѓжЬАзЃАеНХзЪДжЦєеЉП,дљЖе¶Вж≠§дЄАжЭ•дљ†е∞±жЧ†ж≥ХеѓєеОЯеІЛе≠ЧиКВжХ∞жНЃињЫи°МжУНдљЬ,иАМињЩжШѓжО•дЄЛжЭ•ињЫи°МжК†иЙ≤(Color Keying)жЧґи¶БеБЪзЪД.
дЄАжЧ¶жХ∞жНЃдїОжЦЗдїґдЄ≠еК†иљљеЗЇжЭ•еРО,жИСдїђе∞±йЬАи¶БдЇІзФЯдЄАдЄ™жЦ∞зЪДOpenGLзЇєзРЖ,еєґдЄЇдєЛжПРдЊЫжХ∞жНЃ.ињЩеЬ®зЇєзРЖ襀й¶Цжђ°и¶БиѓЈж±ВжЧґ,еЬ®CTexture::BindеЗљжХ∞дЄ≠еЃЮзО∞:
<!--<br /><br />Code highlighting produced by Actipro CodeHighlighter (freeware)<br />http://www.CodeHighlighter.com/<br /><br />-->voidCTexture::Bind()const
{
//IfthetexturehasnotbeengeneratedinOpenGLyet,
//generateit.
if(!m_glId)
{
//GenerateonenewtextureId.
glGenTextures(1,&m_glId);
//Makethistexturetheactiveone,sothateach
//subsequentglTex*callswillaffectit.
glBindTexture(GL_TEXTURE_2D,m_glId);
//Specifyalinearfilterforboththeminificationand
//magnification.
glTexParameterf(GL_TEXTURE_2D,GL_TEXTURE_MAG_FILTER,GL_LINEAR);
glTexParameterf(GL_TEXTURE_2D,GL_TEXTURE_MIN_FILTER,GL_LINEAR);
//SetsdrawingmodetoGL_MODULATE
glTexEnvf(GL_TEXTURE_ENV,GL_TEXTURE_ENV_MODE,GL_MODULATE);
//Finally,generatethetexturedatainOpenGL.
glTexImage2D(GL_TEXTURE_2D,0,4,m_TextData.nWidth,m_TextData.nHeight,
0,GL_RGBA,GL_UNSIGNED_BYTE,m_TextData.pData);
}
//MaketheexistingtexturespecifiedbyitsOpenGLid
//theactivetexture.
glBindTexture(GL_TEXTURE_2D,m_glId);
}
OpenGLйЗНи¶БзЪДдЄАзВєжШѓеЃГжѓПжђ°еП™иГљдљњзФ®дЄАдЄ™зЇєзРЖ.еЫ†ж≠§,и¶БжГ≥еѓєдЄАдЄ™е§Ъ茺嚥賳篺зРЖ,е∞±ењЕй°їйАЙдЄ≠жіїеК®зЇєзРЖ(дєЯеПЂвАЭзїСеЃЪвАЭ).ињЩйАЪињЗи∞ГзФ®glBindTextureжЭ•еЃМжИР.жѓПдЄ™OpenGLзЇєзРЖйГљжЬЙеЕґid,ињЩйЗМжИСдїђе∞ЖеЕґе≠ШеВ®еЬ® CTextureз±їзЪДm_glIdжИРеСШеПШйЗПдЄ≠.idдЄЇ0и°®жШОзЇєзРЖињШж≤°жЬЙ襀OpenGLдЇІзФЯеЗЇжЭ•.еЫ†ж≠§,ељУж≠§еЗљжХ∞зђђдЄА搰襀и∞ГзФ®жЧґ,m_glIdе∞ЖдЉЪжШѓ0.ж≠§жЧґжИСдїђе∞ЖдЉЪи∞ГзФ®glGenTexturesжЭ•иѓЈж±ВOpenGLдЇІзФЯдЄАдЄ™id.
m_glIdжШѓmutableзЪД,ињЩжШѓеЫ†дЄЇжИСдїђжГ≥иЃ©BindеЗљжХ∞жШѓconstзЪД,иАМињЩдЄ™жИРеСШеПШйЗПеϙ襀䜁жФєдЄАжђ°(ељУзЇєзРЖ襀䯲зФЯжЧґеѓєеЕґдњЃжФє).glGenTexturesеЗљжХ∞еПѓдї•еЕБиЃЄдљ†дЇІзФЯе§ЪдЄ™Id(зђђдЄАдЄ™еПВжХ∞е∞±жШѓи¶БдЇІзФЯзЪДIdдЄ™жХ∞),дљЖжИСдїђеП™жГ≥и¶БеНХдЄ™Id.зДґеРОжИСдїђи∞ГзФ®glBindTexture:ињЩе∞ЖзїСеЃЪзЇєзРЖ(йАЪињЗеЕґId)еИ∞жіїеК®зЪД2зїізЇєзРЖдЄК.ињЩжШѓењЕй°їзЪД,еЫ†дЄЇжО•дЄЛжЭ•зЪДзЇєзРЖжУНдљЬе∞ЖдЉЪељ±еУНеИ∞дљ†ињЩйЗМжМЗеЃЪзЪДзЙєеЃЪзЇєзРЖ.
жО•дЄЛжЭ•зЪДзЇєзРЖжУНдљЬе∞±дЄНиІ£йЗКдЇЖ,еПѓдї•еПВиАГзЇҐеЃЭдє¶вА¶
жК†иЙ≤пЉИColor KeyingпЉЙ
жИСдїђжАїжШѓblitзߩ嚥еМЇеЯЯзЪДеЫЊзЙЗпЉМдљЖжШѓеЊИжШЊзДґпЉМеЗ†дєОж≤°жЬЙдЄАдЄ™жЄЄжИПзЪДиІТиЙ≤еЫЊзЙЗжШѓзߩ嚥зЪДгАВзЊОеЈ•жККеЫЊзЙЗзФїеИ∞дЄАдЄ™зߩ嚥иМГеЫіеЖЕпЉМе¶ВжЮЬиЃЊеЃЪдЇЖзЙєеЃЪзЪДиГМжЩѓйҐЬиЙ≤пЉМжИСдїђе∞±еПѓдї•жККзߩ嚥еЫЊзЙЗдЄКзЪДиІТиЙ≤вАЬжК†вАЭдЄЛжЭ•пЉМзЫЄеѓєдЇОиГМжЩѓжЭ•иѓіпЉМжИСдїђе∞±жШѓжККдЄНе±ЮдЇОиІТиЙ≤зЪДиГМжЩѓйҐЬиЙ≤жЙ£жОЙпЉМжХЕзІ∞жК†иЙ≤гАВжЬЙдЇЫжЦЗдїґж†ЉеЉПдЄНжФѓжМБйАПжШОйАЪйБУ(жѓФе¶ВbmpжЦЗдїґ),еЫ†ж≠§е¶ВжЮЬдљ†жГ≥иЃ©зЇєзРЖеЫЊзЙЗзЪДжЯРдЇЫйГ®еИЖйАПжШО,еФѓдЄАзЪДйАЙжЛ©е∞±жШѓдљњзФ®дЄАдЄ™зЙєеЃЪзЪДйҐЬиЙ≤жЭ•жђЇй™ЧзО©еЃґ.OpenGLеєґдЄНжФѓжМБжК†иЙ≤,дљЖйАЪињЗзЇєзРЖеЫЊзЙЗзЪДAlphaйАЪйБУеПѓдї•еЊИиљїжЭЊеЬ∞еК†еЕ•ињЩдЄ™зЙєжАІ.ињЩе∞±жШѓCTexture::SetColorKeyеЗљжХ∞жЙАеБЪзЪД:
<!--<br /><br />Code highlighting produced by Actipro CodeHighlighter (freeware)<br />http://www.CodeHighlighter.com/<br /><br />-->voidCTexture::SetColorKey(unsignedcharRed,unsignedcharGreen,unsignedcharBlue)
{
//IfthetexturehasalreadybeenspecifiedtoOpenGL,
//wedeleteit.
if(m_glId)
{
glDeleteTextures(1,&m_glId);
m_glId=0;
}
//Forallthepixelsthatcorrespondtothespecifedcolor,
//setthealphachannelto0(transparent)andresettheother
//onesto255.
unsignedlongCount=m_TextData.nWidth*m_TextData.nHeight*4;
for(unsignedlongi=0;i<Count;i+=4)
{
if((m_TextData.pData[i]==Red)&&(m_TextData.pData[i+1]==Green)
&&(m_TextData.pData[i+2]==Blue))
m_TextData.pData[i+3]=0;//е∞ЖжМЗеЃЪйҐЬиЙ≤зЪДеГПзі†зВєиЃЊзљЃйАПжШОзЪД
else
m_TextData.pData[i+3]=255;//еЕґдїЦйҐЬиЙ≤зЪДеГПзі†зВєиЃЊзљЃдЄЇдЄНйАПжШО
}
}
еЃГзЪДеЃЮзО∞еЊИзЃАеНХ:йБНеОЖжЙАжЬЙзЇєзРЖжХ∞жНЃ,еѓїжЙЊжМЗеЃЪйҐЬиЙ≤зЪДеГПзі†зВє,е∞ЖеЕґAlphaйАЪйБУиЃЊзљЃдЄЇ0,еЃГе∞±еПШеЊЧйАПжШОдЇЖ.иАМеѓєдЇОеЕґдїЦеГПзі†зВє,е∞ЖеЕґAlphaйАЪйБУиЃЊзљЃдЄЇ255.еЬ®ињЩж†ЈеБЪдєЛеЙН,жИСдїђењЕй°їеЕИж£АжЯ•зЇєзРЖжШѓеР¶еЈ≤зїПжМЗеЃЪзїЩOpenGLдЇЖ.иЛ•жШѓ,еИЩењЕй°їеЬ®OpenGLдЄ≠йЗНжЦ∞еК†иљљзЇєзРЖ.ињЩеП™йЬАи¶БйАЪињЗиЃЊзљЃm_glIdдЄЇ0е∞±еПѓдї•еЃМжИР(ињШиЃ∞еЊЧеРЧ?еЬ®BindеЗљжХ∞дЄ≠дЉЪй¶ЦеЕИж£АжЯ•ињЩдЄ™еПШйЗПжШѓеР¶дЄЇ0!).
жЬАеРО,зЇєзРЖжШѓеЉХзФ®иЃ°жХ∞зЪД,еєґдЄФеЃГзЪДжЮДйА†еЗљжХ∞жШѓеПЧдњЭжК§зЪД,еЫ†ж≠§дљ†жЧ†ж≥ХзЫіжО•еИЫеїЇдЄАдЄ™CTextureеѓєи±°.еЉХзФ®иЃ°жХ∞жШѓйАЪињЗдЄЛйЭҐдЄ§дЄ™еЗљжХ∞еЃЮзО∞зЪД:
{
//Increasethereferencecount.
m_iRefCount++;
}
voidCTexture::ReleaseReference()
{
//Decreasethereferencecount.Ifitreaches0,
//thetextureisreleasedfromthetexturemanager.
m_iRefCount--;
if(m_iRefCount==0)
CTextureManager::GetInstance()->ReleaseTexture(m_strTextName);
}
дєЛжЙАдї•и¶БдљњзФ®еЉХзФ®иЃ°жХ∞,жШѓеЫ†дЄЇе§ЪдЄ™CImageеѓєи±°еПѓдї•еЉХзФ®еРМдЄАдЄ™зЇєзРЖ.жИСдїђењЕй°їзЯ•йБУж≠§жЧґжЬЙе§Ъе∞СдЄ™CImageеѓєи±°еЬ®дљњзФ®ж≠§зЇєзРЖ,иАМдЄНжШѓељУдЄАдЄ™CImageеѓєи±°йФАжѓБжЧґе∞±дїїжДПйЗКжФЊзЇєзРЖиµДжЇР.


- 2008-08-19 17:46
- жµПиІИ 513
- иѓДиЃЇ(0)
- жЯ•зЬЛжЫіе§Ъ
еПСи°®иѓДиЃЇ

зЫЄеЕ≥жО®иНР
OpenGL ES Tutorial for Android вАУ Part I вАУ Setting up the view OpenGL ES Tutorial for Android вАУ Part II вАУ Building a polygon OpenGL ES Tutorial for Android вАУ Part III вАУ Transformations OpenGL ES ...
дљњзФ®C++дї£з†Бе∞Би£ЕзЪДwin32жУНдљЬз±їпЉМ дЄОMFCзЫЄдЉЉпЉМеѓєдЇОе≠¶дє†SDKдЄОC++жШѓеЈ®е•љзЪДеПВиАГ Tutorials Menu of tutorials Tutorial 1: The Simplest Window Tutorial 2: Using Classes and Inheritance Tutorial 3: Using ...
еЉ†ж≠£еПЛж†ЗеЃЪж≥ХеЯЇз°АдЄКзЪДжЈ±еЕ•зРЖиІ£дЄОеЃЮзО∞
иЃ≤иІ£е¶ВдљХеЕ•йЧ®PyTorchпЉМеМЕжЛђеЯЇз°АеОЯзРЖзЯ•иѓЖгАБnumpyдЄОPyTorchзЪДеМЇеИЂдї•еПКж°ИдЊЛз†Фз©ґеЃЮдЊЛ
<br>Introduction <br>This tutorial will start with the very basis of File I/O (Input/Output) in C++. After that, I will look into aspects that are more advanced, showing you some tricks, and ...
дїОgithubдЄЛиљљзЪДUVMеЕ•йЧ®жХЩз®ЛгАВ зљСй°µзЙИжХЩз®Л http://cluelogic.com/2011/07/uvm-tutorial-for-candy-lovers-overview/ еОЯеІЛеЬ∞еЭА https://github.com/cluelogic/uvm-tutorial-for-candy-lovers
This tutorial attempts to get you started developing with the Win32 API as quickly and clearly as possible.
These tutorials will contain comprehensive coverage on Game Programming in OpenGL. These articles are going to assume some familiarty with OpenGL, and C/C++, but thats about it. Not only will these ...
A-tutorial-on-learning-with-Bayesian-networksпЉМA-tutorial-on-learning-with-Bayesian-networksA-tutorial-on-learning-with-Bayesian-networksгАВ
After you have created a new Win32 Application (NOT a console application) in Visual C++, you will need to link the OpenGL libraries. In Visual C++ go to Project, Settings, and then click on the LINK ...
iBATIS-SqlMaps-2-Tutorial_cniBATIS-SqlMaps-2-Tutorial_cn.pdf.pdfiBATIS-SqlMaps-2-Tutorial_cn.pdfiBATIS-SqlMaps-2-Tutorial_cn.pdf
A Tutorial on Reed-Solomon Coding for Fault-Tolerance in RAID-like Systems
forgers win32 asm tutorial
A-Tutorial-on-Joint-Radar-and-Communication-Transmission-for-Veh
https://www.pyimagesearch.com/2018/07/19/opencv-tutorial-a-guide-to-learn-opencv/ дї£з†Б
The C++ Standard Library: A Tutorial and Reference, Second Edition, describes this library as now incorporated into the new ANSI/ISO C++ language standard (C++11). The book provides comprehensive ...
Designed as a guidebook for those who want to become a Java developer, Java 7: A Comprehensive Tutorial discusses the essential Java programming topics that you need to master in order teach other ...
дЄАдЄ™еЯЇдЇОPyOpenGLзЪДPython opengl-tutorialгАВ жЙАжЬЙеЖЕеЃєеЭЗйБµеЊ™ жВ®ињШеПѓдї•еЬ®ињЩйЗМжЙЊеИ∞CеЃЮзО∞пЉЪ : и°®дЄ≠зЪДеЖЕеЃє tu_00_glfw_window_sampleпЉЪGLFWзЙИжЬђељ©иЙ≤зЂЛжЦєдљУгАВ еОЯеІЛжХЩз®Л=> tu_01_color_cubeпЉЪGLUTзЙИжЬђељ©иЙ≤зЂЛжЦєдљУгАВ еОЯеІЛ...
Getting Started with C++ Audio Programming for Game Developers covers a broad range of topics вАУ from loading and playing audio files to simulating sounds within a virtual environment and implementing...
He efficiently presents the complex C++ language in this well-designed tutorial/reference that both students and seasoned programmers will appreciate. The book is ideal as a primary text for ...